Friendship Bracelets
Supplies Needed:
- Embroidery thread
- Scissors
- Tape
- Ruler
Instructions:
1.Cut 6 pieces of embroidery thread to be 30 inches each.
2. With all 6 strands together, tie a tight knot on one end.
3. Tape your end down to the tabletop, and braid three inches down from the knot.
4. Make another knot with all 6 strands at the end of your braid.
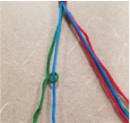
5. Spread out your strands and put them in the color order you want your rows to be. For example, if you want your first row color to be green, make sure your green strand is first.
6. Once they’re in order, grab the first two strands.
7. Take the 1st strand and pass it over the 2nd strand and then behind it.
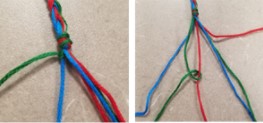
8. Now hold the 2nd strand tight, and pull the 1st strand up towards the large knot. This will create a small knot on the second strand.
9. Repeat this step to make another knot with the 1st and 2nd strands.
10. Continue moving to the right, using the 1st strand to create two knots on each subsequent strand. Be sure you are making two knots!
11. Once you’ve knotted your 1st strand all the way across and it is now the last strand on the right side, you will begin again with the farthest strand to the left. This will now be the color you are knotting.
12. Repeat steps 7-11 until you have 3-4 inches of knotting complete.
13. Tie a knot with all 6 strands at the end of your knotting.
14. Braid another three inches and knot again.
15. Cut the extra embroidery floss from both ends. Your bracelet is done!
